
Digging More Secure Tunnels with IPsec
Introduction
In my last article about IPsec we learned about the building blocks of IPsec in the Linux kernel. We took a look at the tools needed to build encrypted and secured data paths between two hosts. Now we'll use this knowledge and move a step further on.
IPsec is often used to connect two or more different networks by using tunnels. If you have a complex setup, then exchanging keys manually and keeping track of them can get very challenging. IPsec offers a way of handling keys automatically. Let's take a look how this works.
Entering the Tunnels
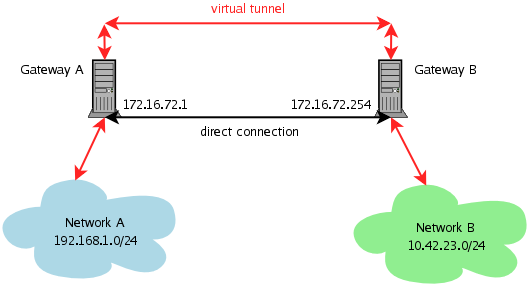
We already know how to encrypt all data between two hosts. We created the keys and put them into the setkey.conf file, where we also configured our security policy that tells the kernel to use IPsec between the IP addresses of our hosts. When using IPsec for remote access purposes, it is far more useful to reach a whole network of hosts than only one IP address. You can do this by using IPsec's tunnel mode. Let's assume that we have two networks named A and B. Both are "behind" two gateways named after the nearest connected network. The classical way to connect both networks is to install a route on both gateways. This means that every packet between network A and B travels unencrypted through the direct connection.
#!/usr/sbin/setkey -f
#
# SPD for gateway A (172.16.72.1)
#
spdadd 192.168.1.0/24 10.42.23.0/24 any -P out ipsec
       esp/tunnel/172.16.72.1-172.16.72.254/require
       ah/tunnel/172.16.72.1-172.16.72.254/require;

spdadd 10.42.23.0/24 192.168.1.0/24 any -P in ipsec
       esp/tunnel/172.16.72.254-172.16.72.1/require
       ah/tunnel/172.16.72.254-172.16.72.1/require;
Let's start with the first spdadd line. It tells the kernel the
following: if you see a outbound packet going from our network
192.168.1.0/24 to the network 10.42.23.0/24, then use IPsec encapsulation
and transport the encapsulated data from our external address 172.16.72.1
to the machine with the address 172.16.72.254. The keyword require
tells the kernel that IPsec encapsulation is mandatory. The second line
defines how to handle the return traffic. Rephrased it says: if you see an
IPsec encapsulated inbound packet coming from the network 10.42.23.0/24 and
going to our network 192.168.1.0/24 and this packet is coming from the
gateway 172.16.72.254 to our external address, then undo the IPsec
encapsulation. These are the policies we need for our tunnel. It sounds
complicated, but if you take the diagram and trace the packet flow, you
will see that it is just a description of what the kernel should do. We now
need the keys. We'll reuse the ones from the last article.
# AH SAD entries with 160 bit keys
add 172.16.72.254 172.16.72.1 ah 0x200 -A hmac-sha1 0x46915c30ed7e2465b42861b6ab19f2772813020c;
add 172.16.72.1 172.16.72.254 ah 0x300 -A hmac-sha1 0xc4dac594f8228e0b94a54758f7fbf2fdf4e37f3e;

# ESP SAD entries with 192 bit keys
add 172.16.72.254 172.16.72.1 esp 0x201 -E rijndael-cbc 0xa3993b3dfc41ef0a1aa8d168a8bf2c27e48249ac17b61e09;
add 172.16.72.1 172.16.72.254 esp 0x301 -E rijndael-cbc 0x8f6498928ba354bd45cfad147f54c67b3b742896b3bafc02;
Again this tells the kernel which keys to use when to go from one gateway to another. You have one line for outbound traffic and one for inbound traffic. Now go ahead and create the configuration on both gateways. You can create one setkey.conf and mirror source and destination for the other gateway since packet flows are symmetrically reversed. Enter the command
setkey -f /path/to/setkey.confon both gateways and try pinging, telnetting or tracerouting to the network "on the other side".
One word about the example setup: I set the gateways' IP addresses so that they're near each other in IP space; this is something you need to do when routing with directly-connected gateways. When using IPsec tunnels, the gateways don't have to be physically connected, and you can create IPsec tunnels between any hosts and networks that "see" each other on layer 3 (IP in our case).
Routing and the Kernel Policy
Maybe you have noticed that we didn't set any routes to the networks we connected. We don't need to. We told the kernel already what to do with the packets. The Security Policy Database takes care of the packets' path. This behaviour has some implications you have to consider. First, whenever using IPsec tunnels your networks can be "contaminated" by packets with an origin IP outside your network. This is actually what you usually want, but it is very important to consider it in order to implement good access control. If a server in network B only expects and allows connections to be from 10.42.23.0/24, then clients in network A cannot access these services. This can be either good or bad. In any case you have to be aware (and possibly take care) of that. This leads to the second consideration - security. When building one or lots of VPN tunnels, you have to be careful where your endpoints are and what networks they can see.
Automatic Keying and X.509 Certificates
Digging multiple tunnels, dealing with many IPsec clients and keeping track of the keys is a big problem. Consider a gateway that expects IPsec connections from 10 other systems. Then the setkey.conf gets a bit crowded and no one will want to maintain long hexadecimal numbers. In addition to that, pre-shared keys are best used with fixed IP addresses. If you obtain IP addresses dynamically, then you have to think of something else.
Fortunately there is a solution for this problem. The Internet Security Association and Key Management Protocol (ISAKMP) is part of IPsec. It was designed "for establishing Security Associations (SA) and cryptographic keys in an Internet environment", to quote the RFC. It can help us with exchanging keys and creating security policies for the Linux kernel. Key exchange and creation of an IPsec connection are broken up into different phases.- Phase 1 is a setup phase, also called main mode. The two partners work out how to exchange information securely. They negotiate the encryption method, the hash algorithm, the authentication methods, and a way to securely exchange encryption keys for the next phase. The result of phase 1 is a "security association" that tells both partners how to communicate securely.
- Phase 2 includes the creation of the security policies for the AH and ESP protocols. That's what we already did manually.
In order to use ISAKMP you have to configure the racoon daemon. It is also part of the ipsec-tools package. Its configuration file is typically found at /etc/racoon/racoon.conf. We will recreate the tunnel above with racoon in order to get to know the most important configuration directives.
While we are at it, we will swap the pre-shared keys for X.509 certificates. This makes life easier when maintaining multiple keys or issuing VPN access to clients. The certificates are used in the same familiar way as SSL certificates on the World Wide Web, a combination also known as HTTPS (encrypted HTTP). Instead of creating long strings, you simply create a self-signed SSL certificate. Your IPsec gateway(s) check these certificates against the public key of your own Certificate Authority (CA). Every certificate signed by your own CA opens a IPsec tunnel, just like a key would. You can now give these certified keys to every host that is allowed to talk IPsec to you. While this sounds more complicated, it really gets easier when dealing with a lot of IPsec clients.
Automatic Keying in Action
Let's rebuild the last example with racoon. It starts like this:
# racoon.conf file for gateway A
#
path certificate "/etc/racoon/certs";
path pre_shared_key "/etc/racoon/psk.txt";
log notify;
listen {
	isakmp 172.16.72.1 [500];
};
The first directive tells racoon where to look for certificates and
certified keys. In our case, this is the directory
/etc/racoon/certs. Then we tell the daemon where to look for a
collection of pre-shared keys (PSKs). You can use PSKs as well, you don't
need to use certificates. The file /etc/racoon/psk.txt holds a list
of unique identifiers (such as hostnames or IP addresses) and their
corresponding keys.
The next line sets the log level. The log level can be either notify, debug or debug2. Increase the log level if you want to see how racoon creates the IPsec connection. All logging goes to syslog. The listen directive tells racoon where to listen for ISAKMP requests. By default it listens on all devices and on port 500/UDP (the default port for ISAKMP). So far, so good. Now we define the path to gateway B.
remote 172.16.72.254 {
	exchange_mode main;
	generate_policy off;
	passive off;
	certificate_type x509 "gateway.a.example.net.cert" "gateway.a.example.net.key";
	ca_type x509 "ca-cert.pem";
	my_identifier asn1dn;
	peers_identifier asn1dn;
	verify_identifier on;
	proposal {
		encryption_algorithm 3des;
		hash_algorithm sha1;
		authentication_method rsasig;
		dh_group modp1024;
	}
}
Let's walk through the options and see what they mean.
- exchange_mode main - defines the key exchange mode. main is a good choice since it is considered more secure.
- generate_policy off and passive off - when using automatic keying one gateway acts as initiator of the IPsec link. The other gateway remains passive and answers the requests of its peer. By using these two directives we define gateway A to be the initiator of the link. Gateway B need the options generate_policy on and passive on to answer.
- certificate_type and ca_type - indicate the type of certificates we use. We use X.509 certificates and racoon needs to know our key, our certificate and the public certificate of our CA. Even though we're using IP addresses for our gateway definitions, make sure that you use hostnames in the certificates and keys. This is good practice.
- my_identifier and peers_identifier - indicate which identifier should be used to identify hosts or IPsec endpoints. You can use either IP addresses, fully-qualified domain name, ASN.1 distinguished names (ASN.1 DNs) or self-defined IDs. We use ASN.1 DNs since our certificates contain them anyway.
- verify_identifier on - means that we wish to verify our peer's identifier by checking the certificate with our CA.
- proposal - this section holds all information for the phase 1. You can define encryption and hash algorithm, authentication method and Diffie-Hellman exponentiations for secure key exchange. The authentication method is rsasig when using certificates, use pre_shared_key for pre-shared keys.
sainfo address 192.168.1.0/24 any address 10.42.23.0/24 any {
        pfs_group modp1024;
        encryption_algorithm aes;
        authentication_algorithm hmac_sha1;
        lifetime time 28800 sec;
        compression_algorithm deflate;
}
The first line announces that the policy is valid for all packets originating in the 192.168.1.0/24
network and going to the 10.42.23.0/24 network.
- pfs_group modp1024 - is used as a parameter for the Diffie-Hellman algorithm.
- encryption_algorithm aes - selects the AES encryption algorithm. You can specify more than one algorithm. One will be chosen during phase 2.
- authentication_algorithm hmac_sha1 - select the authentication algorithm. Again you can specify more than one.
- lifetime time 28800 sec - tells racoon how often this security policy needs to be renegotiated.
- compression_algorithm deflate - selects a compression algorithm. Currently there is only one implemented.
/etc/init.d/racoon startCheck the logs. Most probably not much will happen. The IPsec connection will be initiated by the gateway with the option passive off enabled. Use a client on this gateway's network and create some traffic to the network you wish to connect to via the tunnel. After the first packets are sent, the racoon daemon will start ISAKMP and negotiate through phase 1 and 2. If everything goes well, you can send your first ping packets through the tunnel. The tunnel may needs some seconds to come up. You will get messages such as "resource temporarily unavailable" if the tunnel is not yet ready.
Mobile Tunnels for Roadwarriors
IPsec tunnels are frequently used to connect mobile clients "on the road". They connect to a central gateway, sometimes called a VPN or an IPsec server, and create a secure tunnel. You can use our racoon.conf files with some modifications. Your IPsec server needs to be in passive mode since it's waiting for incoming connections. The connections can originate from anywhere, so your peer will be anonymous.
remote anonymous {
	exchange_mode main;
	generate_policy on;
	passive on;
	certificate_type x509 "vpnserf.example.net.cert" "vpnserf.example.net.key";
	ca_type x509 "ca-cert.pem";
	my_identifier asn1dn;
	peers_identifier asn1dn;
	verify_identifier on;
	proposal {
		encryption_algorithm 3des;
		hash_algorithm sha1;
		authentication_method rsasig;
		dh_group modp1024;
	}
}
The rest of the options can stay the same except for generate_policy and passive. Both
need to be enabled. generate_policy tells racoon to create new policies for new
connections; this makes sense because our peer varies. The same considerations need to be applied to
the security policy in phase 2.
sainfo anonymous {
        pfs_group modp1024;
        encryption_algorithm aes;
        authentication_algorithm hmac_sha1;
        lifetime time 1 hour;
        compression_algorithm deflate;
}
It is a good idea to reduce the lifetime for mobile peers. Again, the parameter anonymous lets
racoon accept varying policies. The configuration of the mobile client has to specify
the IPsec server's address and the security policy to our internal networks.
Next time we will take a look at filtering IPsec traffic and protecting exposed IPsec servers. Happy digging!
Further Reading
- IPsec HOWTO
- Internet Security Association and Key Management Protocol (ISAKMP)
- IPSec Key Exchange (IKE)
- Certificate Authority (definition)
- Creating a self-signed SSL certificate
- TinyCA
Talkback: Discuss this article with The Answer Gang
![[BIO]](../gx/authors/pfeiffer.jpg)
René was born in the year of Atari's founding and the release of the game Pong. Since his early youth he started taking things apart to see how they work. He couldn't even pass construction sites without looking for electrical wires that might seem interesting. The interest in computing began when his grandfather bought him a 4-bit microcontroller with 256 byte RAM and a 4096 byte operating system, forcing him to learn assembler before any other language.
After finishing school he went to university in order to study physics. He then collected experiences with a C64, a C128, two Amigas, DEC's Ultrix, OpenVMS and finally GNU/Linux on a PC in 1997. He is using Linux since this day and still likes to take things apart und put them together again. Freedom of tinkering brought him close to the Free Software movement, where he puts some effort into the right to understand how things work. He is also involved with civil liberty groups focusing on digital rights.
Since 1999 he is offering his skills as a freelancer. His main activities include system/network administration, scripting and consulting. In 2001 he started to give lectures on computer security at the Technikum Wien. Apart from staring into computer monitors, inspecting hardware and talking to network equipment he is fond of scuba diving, writing, or photographing with his digital camera. He would like to have a go at storytelling and roleplaying again as soon as he finds some more spare time on his backup devices.
